Make a Unique Wedding Invitation that’s Translucent & Animates with a Spin
Need more than a page for your invitation? Then use both sides of the card by making it rotate about a pin with these card making instructions plus tips and tricks
Of course there are so many ways to make a unique wedding invitation. However, have you tried animating translucent plastic sheets by revolving them about a center pin? Not to worry, this page shows you how to do that.

Apart from making the coolest unique cards for inviting guests to your wedding, there is another advantage:

You end up with an additional page to use for conveying your wedding information.
Don’t need the additional page? Then use it for aesthetic appeal and effects.
Can you guess what greeting card format this is?
The fact that this unique wedding invitation revolves doesn’t change it’s format. It’s translucent nature doesn’t affect this either. Anyway you spin it, it’s still a single leaf greeting card format.
Card Making Tools and Materials

- 12” x 12” transparent plastic sheet with curly art designs
- 8.5” x 11” frosted translucent plastic report cover sheet
- Blue translucent plastic file divider
- Purple translucent plastic file divider
- Metal floral stem wires of about 26 gage
- Wire cutter or pliers
- Double sided glue sheets
- Tweezers
- Rubber stamps
- Stamping blocks
- Masking tape
- Black ink pad
- Drawing pencil
- Eraser
- Scissors
- Metal ruler
- Scoring stick
- Cutting mat
- Craft cutting knife
Card Making Instructions
Unpeel only one side of the glue sheet and paste it at the corner of the back of the transparent plastic sheet with curly art designs.
Don’t unpeel the other side of the glue sheet yet. Instead, place the purple translucent sheet over it and temporarily hold them together with tape.
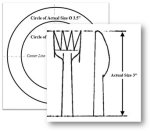
Cut out the 4” x 5” size of the unique wedding invitation. In this case, this is the size of the glue sheet.
Use the temporary tape to hold the two sides you just cut out.
Draw a rectangle inside the card with about ⅜” margin.
Cut out this rectangular center.
Place this cut out center rectangle on the blue translucent sheet and temporarily hold them together with tape.
Cut out the blue translucent sheet with about 0.25” margin on the two unmatched sides. This makes it easier to hold them.
Use temporary tape to hold the newly cut sides.
Trim to size by cutting off the excess 0.25” blue translucent material left from the above cut as needed.
Use your pencil to draw a line to mark the center where you want the unique wedding invitation to rotate.
Remove the temporary tape from three of the sides leaving the fourth side as it is.
Open up both plastic sheets and use your tweezers to peel open the second face of the double sided glue sheet.
Using the center pencil mark as a guide, place the metal floral stem wire on the open glue face.
Close the blue translucent plastic on the glue sheet with the metal wire in the middle.
On the rectangular frame, draw a line to mark the center of the piece where you want the unique wedding invitation to rotate.
Remove the temporary tape from three of the sides leaving the fourth side as it is.
Open up both plastic sheets and use your tweezers to peel open the second face of the double sided glue sheet.
Using the center pencil mark as a guide, place the blue piece in the middle of the frame such that metal wire sticks on the open glue face.
Close the purple translucent plastic on the glue sheet with the metal wire in the middle.
Use the wire cutters to snip off the excess protruding metal wires
Erase all pencil marks from the unique wedding invitation card.
On the frosted translucent sheet, use the rubber stamps and black ink pad to create the prints and messages for both sides of the card. In this case, create “It’s Our Wedding” for the small one and the wedding invitation details on the larger one.
Peel off only one side of the double sided glue sheets and stick them on the back of the stamped work.
Trace out the silhouette of the stamp work with 0.25” margin for the small one and 1/16” margin for the big one.
Cut out the frosted sheet along the pencil marked silhouette path.
Erase all pencil marks.
Peel the glue sheet on the small sized stamp work with “It’s Our Wedding” and paste it in the center of the front of the card. In this case, the front is the transparent sheet with the curly art.
Finally, peel the glue sheet on the big sized stamp work and paste it in the center of the back of the unique wedding invitation. In this case, the back is the side with the blue and purple translucent sheets.


Important Edge Tips and Tricks

Consider cutting off a sliver from all the edges to give enough of a gap for the card's center piece to freely revolve without bumping into any of the surrounding edges.
Are you wondering why I cut off slivers from all the edges instead of just two? This way, the background curly art on the card does not misalign at the edges.


Card Safety Tip

After cutting off the wire, the ends may still protrude or remain sharp.
Simply use precision files to remove the excess materials and any sharp edges.

Another Card Design Tip

If the stamp work is not legible because the material is too transparent, you could double the translucent sheets with a piece of glue sheet between them to make it more opaque.

At this point, all you have to do is determine how many you need to make for inviting all your guests. While you're figuring that out, here are a few additional card making tips and tricks for you to ponder over:
Can you guess how this prototype saved me?

I created some prototypes to help me come up with this card concept. The prototypes helped me to prevent a blunder that I wasn't even thinking about? Can you guess what the blunder was?
If you can't, don't worry. I already discussed about it, plus other useful card model stuff, when I wrote about the necessity of greeting card prototypes.
More Card Making Tips and Tricks

Have a color or theme for your wedding?
You can use that in the unique wedding invitation by changing the translucent plastic material styles and colors.
The possibilities
are endless. Plus, these materials are available in craft stores.

Can’t find the types or colors of translucent sheets you want in the craft stores?
Consider using other things made out of translucent plastic sheets like file pockets, folders, envelopes and dividers.
These are sold in office supply stores.

|
|
| |
|
| |


Recent Articles
-
Get Free Greeting Card Templates plus Ideas on How to Make Yours
 Download Various Types of Greeting Card Templates and Get Options for Adapting Them. Includes Precautions and Proactive Steps to Help Prevent Messing Up Yours.
 -
Did You Notice the Revamped Homepage?
Indeed, it’s been a longtime coming, but the homepage makeover is finally here. For comparison, feel free to see the way it used to look as captured through the inescapable Wayback Machine Internet Ar… -
Free Card Greetings for Saying Hello and Goodbye in Your Greeting Card
Get ideas to personalize your greeting card salutations and valedictions because cool card greetings make great first impressions about your greeting card messages.
New! Comments
Have your say about what you just read! Leave us a comment in the box below.