A Thank You Card You Can Make for Expressing Special Gratitude
Get card making instructions for this special thank you card that’s perfect for appreciating someone that did something great. By the way, do you know what’s so special about this card?
Do you want to give a thank you card to someone for doing something exceptional? Then, only a special thank you greeting card will do. Here’s one that’s perfect for that purpose.

So are you wondering what’s so special about this creative thank you card? Two reasons:
- First, it’s a unique hybrid of pamphlet and double door greeting card formats.
- Second, while most cards open right-handed in an anticlockwise direction from right to left, this card opens left-handed in a clockwise direction from left to right.

Tools and Materials

- One cardstock with flower design and red background
- One cardstock with flower design and green background
- One colorful cardstock design with off-white or vanilla background
- One grey sheet with white polka dots
- White cardstock paper
- 0.25” thick foam board
- Rubber stamp
- Rubber stamping block
- Black ink pad
- Drawing pencil
- Ultra bright coloring pencils
- Eraser
- Scissors
- Metal ruler
- Scoring stick
- Cutting mat
- Craft cutting knife
- Glue
Card Making Instructions
On the colorful cardstock design with off-white or vanilla background, draw and cut out a 4.75” x 5.5” rectangle.
On the flowery cardstock with red background, draw and cut out a 4.5” x 4.75” rectangle.
On the flowery cardstock with green background, draw and cut out a 4.75” x 5.5” rectangle.
On the white cardstock, cut out a 3.5” x 3.5” square.
Use the black ink pad and rubber stamp to print thank you on the white cardstock.
Use the ultra bright colored pencils to paint the stamped art.
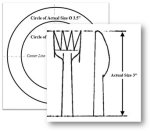
Draw a silhouette around the finished stamped art to give a 0.25” margin all around. Try to fit this silhouette within a 2.5” x 2.75” window.
Cut off the drawn silhouette margin.
Place this silhouette cut out on the green background cardstock of 5.5” length by 4.75” height with 1” margins from the top, bottom, and left edges, but 1.75” from the right edge.
Trace and cut out a bigger silhouette of 0.25” margin around this cutout.
Score and bend the right side of this at 0.75” from the edge.
On the red background of 4.5” length by 4.75” height, score and bend the left side at 0.75” from the edge.
Cut out 0.25” sliver from the top and bottom corners of the bent edges for both red and green cardstock pieces. This ensures that those edges will remain hidden when the thank you card is finished.
Glue the bent parts of these red and green pieces behind the left and right edges of the colorful off-white or vanilla background cardstock design of 5.5” length by 4.75” height to complete the greeting card format.
On the foam board, cut out about 3.5” x 3.5” square.
Using the edges of the cutout thank you card silhouette as a guide, trace out that same cutout shape on the foam board as well as the remaining white cardstock paper.
Cut out the traced silhouette on the white cardstock. However, use your craft cutting knife on the foam board.
Cut out a 0.75” strip from the grey sheet with white polka dots.
Score and fold this flat strip into a u-shaped strip of 0.25” sides
Place this u-shaped strip along the edges of the foam piece. Then use scissors and glue to cut straight pieces and triangles on the open edges of the u-strip so that the strip easily curves, bends, and glues to the edges of the foam board.
Place the thank you art cardstock on the top and the matching plain white cardstock on the bottom of the finished foam piece.
Glue them edge to edge on the top and bottom of the foam piece. These cover up the bent parts of the grey u-shaped strip with white polka dots.
Finally, to complete the thank you card, glue the finished foam piece in the center of the cut out window but on the red background cardstock only.


Time Saving Tip

Save time by gluing a piece of 0.25” flat strip instead of slicing and dicing the 0.75” u-bent strip. The only disadvantage to watch out for is that the edges of the foam board can still show.
This may not matter much here because the foam board is white and the other cardstock for that location is white as well, so they blend into each other. If the colors were different, then this method would need more care and precision.


More Card Making Tips and Tricks

Putting together this greeting card format from three pieces could make the edges differ slightly by a sliver.
You could avoid this by temporarily taping the cardstock together before cutting them. That way, all three will have the exact same height because you cut them at the same time.
Alternatively, if you cut them separately, you could simply hold them down afterwards at the edge with your metal ruler and run your craft knife through to cut off the sliver.

|
|
| |
|
| |


Recent Articles
-
Get Free Greeting Card Templates plus Ideas on How to Make Yours
 Download Various Types of Greeting Card Templates and Get Options for Adapting Them. Includes Precautions and Proactive Steps to Help Prevent Messing Up Yours.
 -
Did You Notice the Revamped Homepage?
Indeed, it’s been a longtime coming, but the homepage makeover is finally here. For comparison, feel free to see the way it used to look as captured through the inescapable Wayback Machine Internet Ar… -
Free Card Greetings for Saying Hello and Goodbye in Your Greeting Card
Get ideas to personalize your greeting card salutations and valedictions because cool card greetings make great first impressions about your greeting card messages.
New! Comments
Have your say about what you just read! Leave us a comment in the box below.