Create a Unique Picnic Invitation That’s Sure to Make an Impression
Use a unique card feature to make this creative picnic invite. Plus get tips and card making instructions
Hosting a picnic or barbecue? How about announcing this with a unique picnic invitation such as this one.

Making this unique invitation involves cutting the whole card into strips and weaving it all together.
Since the weave covers the whole card, it falls into
one of the many ways of creating unique cards.
However, if the weave covers only a portion of the card, then you are
making a creative card.
The choice is yours. Either way, it will still turn into a beautiful invite.
Tools and Materials
4” x 10” typhoon cardstock paper - darkest blue
5” x 8” slate blue cardstock paper - middle shade blue
3.5” x 3.5” pastel blue cardstock paper - lightest blue
4” x 10” red cardstock paper - darker red
5” x 8” pastel red cardstock paper - lighter pinkish red
two of 4.5” x 4.5” white cardstock paper
3” x 3.5” white cardstock paper
Some aluminum foil
Decorative edge scissors
Black ink pad
Rubber stamps
Mounting blocks for rubber stamps
Drawing pencil
Eraser
Scissors
Sliding paper trimmer
Metal ruler
Scoring stick
Circle template
Circle cutter
Cutting mat
Craft cutting knife
Glue
Step by Step Instructions
Cut the 4” x 10” typhoon cardstock into four 1” x 10” strips.
Cut the 4” x 10” red cardstock into four 1” x 10” strips.
Cut the 5” x 8” slate blue cardstock into five 1” x 8” strips.
Cut the 5” x 8” pastel red cardstock into five 1” x 8” strips.
Place the horizontal typhoon and red strips side by side. Alternate them and temporarily tape them down to hold them together.
Weave these horizontal strips with the vertical slate blue and pastel red strips. Alternate these vertical strips as well.
Please note that, because of the tape, the first strip will have to go last... after you remove the tape.
Remove the tape and weave in the final strip. Then slightly push and pull the strips to properly balance out the weave arrangement inside the card.
There’s more on this, plus an alternative method for preparing the strips for this step in the tips and tricks section below.
Glue the strip ends all around the four edges of the weaved greeting card so that it can no longer accidentally un-weave.
Score the weaved paper right in the middle and fold into a 5” x 8” card.
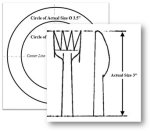
On the first 4.5” x 4.5” white cardstock, cut out two circles of 2.5” and 3.5” diameters with the same circle center. Hence, this gives a ring of 0.5” thickness.
On the second 4.5” x 4.5” white cardstock, cut out a circle of 3.5” diameter.
Glue the white ring on the white circle to form the plate
glue the plate right in the middle of the folded weave card.
On the 3.5” x 3.5” pastel blue cardstock draw 4 guidelines to represent the two stamping margins of 1” space each.
Using black ink, rubber stamp “It’s a Picnic” on the first margin and “You’re invited” on the second margin.
Use the decorative edge scissors to cut out the strips containing these words. For this, use the pencil margin lines as your guide.
Erase any pencil marks.
Glue these word-strips in place at the top and bottom parts of the card.
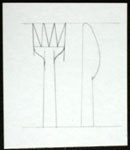
On the 3” x 3.5” white cardstock, draw two lines to represent a 3” wide space.
Using this 3” space as length of the silverware, draw a fork and knife.
Cut out the paper fork and knife.
Glue the paper fork and knife on the small piece of aluminum foil.
Trim the aluminum foil to create about ⅛” margin round the cutlery.
Fold the aluminum foil over the edges of the utensils.
Finally, glue the Fork and knife on the invitation plate.


Now, you know how to make the invitation. However, here are a few other things to consider.
Important Tips and Tricks
After weaving the invite this way, the bends and spaces between the weaves extends the size of the finished card. And this makes the strips too short for the greeting card.
This is expected. And it gives a great effect.
However, if you don’t want this, simple cut the strips about 1” longer. And then trim off the excess after weaving and gluing the unique invite together just like in this woven valentine card.
Using the tape here is for a temporary hold, not a permanent bond.
Therefore, it’s a good idea to run the tape on a piece of cloth a couple times to weaken the bond before using it to hold the strips.
If not, the tape may peel off the paper when you try to take it up. And this will mess up the greeting card.

|
|
| |
|
| |


Recent Articles
-
Get Free Greeting Card Templates plus Ideas on How to Make Yours
 Download Various Types of Greeting Card Templates and Get Options for Adapting Them. Includes Precautions and Proactive Steps to Help Prevent Messing Up Yours.
 -
Did You Notice the Revamped Homepage?
Indeed, it’s been a longtime coming, but the homepage makeover is finally here. For comparison, feel free to see the way it used to look as captured through the inescapable Wayback Machine Internet Ar… -
Free Card Greetings for Saying Hello and Goodbye in Your Greeting Card
Get ideas to personalize your greeting card salutations and valedictions because cool card greetings make great first impressions about your greeting card messages.
New! Comments
Have your say about what you just read! Leave us a comment in the box below.