Free Card Making Tips and Tricks to Spice Up Your Greeting Card Adventure
Add variety and view time saving options. Also, get access to card making instructions associated with the card crafting tips and tricks
Browsing through a list of card making tips and tricks is like digging into a treasure trove of ideas because...
...You never know what you’ll find or how it’ll change your card making ability.
Apart from this, new greeting card tips, tricks, and ideas get included in this site from time to time. Want to catch them as they appear? Then subscribe to this site’s blog.
Also, if interested in actual cards where these tips and tricks could come in handy, then consider the tips and tricks as portals to their respective free card making instructions.
By the way, these greeting card design tips and tricks are all free.
Click on the link below to jump to that section on this page
- Blunders that Could Make You Start Over
- Time Saving Tips and Tricks
- Transforming the Art and Theme
- Edges Are Fun but Tricky
- Letters, Words, & Calligraphy
- Tips & Tricks for Your Supplies
- Cleanliness Is Next to Creativeness
Blunders that Could Make You Start Over
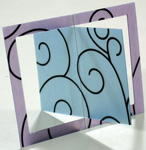
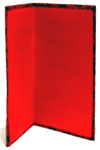
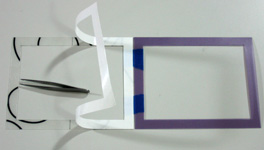
For Transparent Cards, Handle Glue Sheets with Care
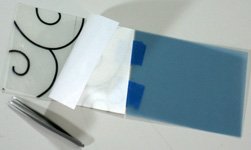
With ordinary paper, you may get away with treating your glue sheets anyhow. However, with specialty transparent materials, the cards may turn out forever smudged and you would have to start all over.
Don't want this? Then form the habit to always handle glue sheets with care. For example, when peeling off the protective sheets, use tweezers instead of your fingers. A little smear or fingerprint is all it takes to ruin the project.
Related projects:
Unique Wedding Invitation
|
Anniversary Card
|
Valentines Day Card
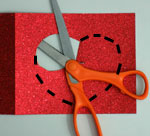
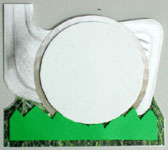
Want Flimsy Materials to Retain Their Shapes After Gluing Them Down?
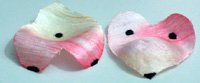
If you don't properly handle 3D flimsy materials while gluing them down, they won't retain their 3D shape afterwards.
To prevent this, put glue drops only on the spots that touch the surface. For example, on the 3D petals shown with these card making tips and tricks, the black spots illustrate where the petals touch the surface.
Related card project:
Love Card
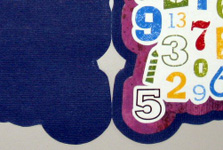
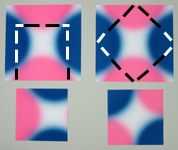
Beware of Directional Greeting Card Graphics
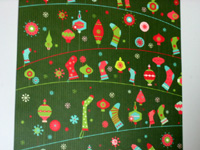
Most greeting card graphics are positioned randomly on the page. However, you'll always run into the ones that have specific directions.
In other words, it's possible to wrongly place them upside down. For instance, socks cannot hang upside down.
To prevent this, always check to make sure the art has the right side up.
Project related to these greeting card design tips:
Christmas Symbols Card
Consequence of Using a Permanent Tape for a Temporal Hold
Want to temporarily use a permanent adhesive tape?
Then, tape and rip it off a couple times on a piece of cloth before using it on the paper project.
This weakens it. Hence, it prevents your paper craft from tearing when you take off the adhesive tape.
Related paper projects:
Valentine Card
|
Picnic Invitation
Don't Totally Cut Away the Folded Edge
It's cool to transform edges into desired contours and shapes.
Nonetheless, while cutting, remember to leave enough of the folded edge.
This makes sure the finished card still opens and closes as intended.
Projects from these card making tips:
Love Card
|
Funny Birthday Card
So You Want to Handle Flimsy Material Covered in Glue?
Moving flimsy materials like cloth or craft tissues after coating them with adhesive is difficult because the materials usually wrinkle.
Hence, the material sticks to itself and is unavoidably condemned.
For card making tips and tricks, one option is not to use adhesive on the flimsy material but on the destination material.
Another alternative is: don't move the flimsy material. Instead, bring the destination material to the glue covered flimsy one.
Related card project:
Love Greeting Card
Cutting Method Can Make or Mar the Project
Different cutting methods include using scissors, hand shears, guillotine, craft knife on a cutting mat, cutting knife with no mat but in a back-and-forth motion over the material, and many others.
Most of the time, the method of choice is based on convenience.
However, there are a few but critical times when the wrong method will mess up the work and force you to start over. This usually happens when you're working with a new or specialty material.
So, when in doubt, test-cut a small section that will not affect the parts you intend to use for the card.
Project related to these card making tips:
Anniversary Card
Time Saving Tips and Tricks
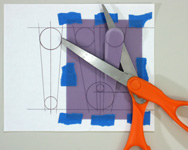
Cutting Multiple Pieces of the Same Shape and Size
With card making tips and tricks, when cutting a few pieces of the same shape and size, it's quicker to temporarily tape them together and cut them all at once.
Projects associated with these greeting card tips and tricks:
50th Birthday Card
|
Pizza Party Invitation Card
Quick Way to Add Edge Decorations
For straight edges, it's easy to run U-shaped strips along the length. However, with curved edges, this gets complex because you have to cut out strips and bend them every few millimeters.
Therefore, for curved or complex edges, save time by using flat strips that match the thickness of the edges.
Related edge design project:
Thank You Card
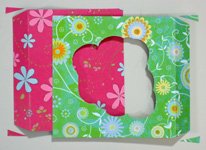
Need the Shaped Window, But Don't Need the Cut Out Piece?
Using a craft cutting knife to cut out a window shape also leaves the cut out piece intact.
But if you don't need this cut out piece afterward, then create a big slit on this part of the card.
Then fit a scissors in and get through the rest of the cut in a jiffy.
Related cards:
Romantic Holiday Card
|
Unique Birthday Card
|
Thank You Card
Tracing is Always Quicker Than Drawing Afresh
When it comes to card making tips and tricks, it's creative to use a shaped foam piece for 3D depth effect?
Nonetheless, it's even faster to create this foam piece by tracing the already completed cut out you intend to elevate.
Related projects:
Baby Shower Greeting Card
|
Golf Birthday Card
Does It Hurt to Use Scissors on Thick Materials?
There are times when you have to double (or triple) the material to get the thickness or effect you want.
This double thickness sometimes makes cutting with a pair of scissors painful on the hands. Hence, it slows you down.
If this is the case for you, dig into your arsenal of greeting card supplies (plus home improvement tools) and replace that scissors with a pair of hand shears. Then see if this makes the cutting process faster and less painful.
Greeting card project:
Anniversary Card
|
Unique Wedding Invitation
Transforming the Art and Theme
You Too Can Create Impressive Background Art
Can't find the background art you want? You don't have to settle. Instead, create your own background designs using rubber stamps or other means.
The key is too leave the right gap size after each stamp impression. Too much gap and it looks like something is missing. Too little gap and you may stamp on top of the last impression. So don't rush it.
Related background art projects:
Anniversary Card
|
Funny Birthday Card
Card Making Tips and Tricks for Making the Art Suit the Card
Do you want to turn that lovely homemade art piece into a greeting card but the size is getting in the way?
In truth, re-sizing the card project to match the art leads to a cool and uniquely sized card.
On the other hand, using a copier or printing device to enlarge or reduce the art to suit the greeting card size is not a bad idea either.
Project related to these greeting card art tips:
Thinking of You Card
Bring Art to Each Page by Using Different Sheets
Do you have to join a couple sheets to get the complete card folds and pages because one sheet is too small? Then, don't just use multiples of the same sheets and designs.
Instead, make the card even more aesthetic by using various cardstocks with different designs and art for each page.
However, you don't have to wait to run into this situation before you decide to use dissimilar materials for each page. You can still do this even if it's possible to fold the whole card from a single sheet.
Greeting card associated with these tips on aesthetics: Thank You CardSame Card, Various Themes
Want to transform your card project to suite a different theme?
One option is to change the whole card.
Alternatively, for simpler card making tips and tricks, add or alter a single key element without changing the whole card.
Project related to these greeting card design tips:
Romantic Holiday Card
Increase Your Origami Design Options by Changing Your Cutting Path
It's true that you can cut origami sheets down to size. However, for artistic sheets, the cutting path you take can open doors to other origami design possibilities.
To take advantage of these card making tips and tricks, I sometimes cut a bigger sheet even though I already have the size I need.
Project from these origami card making tips and tricks:
Mothers Day Card
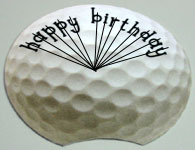
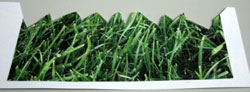
Adding 3D Depth Effect Is Even Better In Color
It's cool to use regular white foam board to create any 3D depth effect. However, it's much better when the foam boards have colors that match the elevated images.
Examples include using red foam for red heart shape, green foam for grass, black foam for car tires, and white foam for golf balls.
Project related to this card crafting tip:
Golf Birthday Card
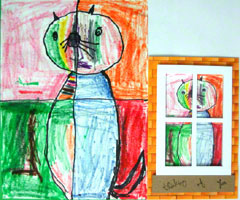
Don't Just Create the Art For the Cover, Consider Inside Too
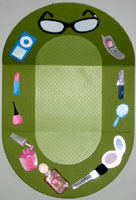
One distinct way to take your card to the next level is to think about how the inside of the card will look as well.
For example, if you are making a card that resembles a purse, it's great to include some purse content art inside the card like lipstick, sunglasses, cell phone, perfume, and others.
Another example is, if creating a woven card, instead of plain white strips, use colors and graphics that create a beautiful pattern inside.
Related card making tips and tricks examples:
Birthday Greeting Card
|
Picnic Invitation
|
Valentine Card
As Always, Feel Free to Accessorize
Sometimes, the event at hand has a color associated with it. And you just want to subtly match that theme.
The good news is, when it comes to card making tips and tricks for art and design, you can never go wrong with accessorizing
So, even if that card element is only there for support and is not technically part of the card, accent it. You'll be amazed at the huge transformation this tiny change will make.
Related card project:
Wedding Invitation
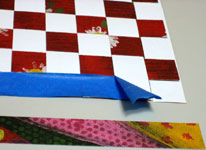
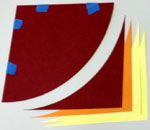
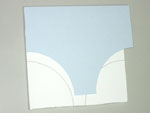
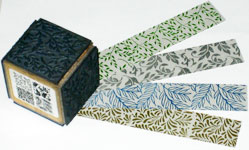
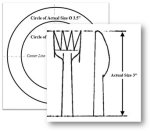
For Origami Sheets with Designs, Add Variety by Changing Where You Start the Fold

When working with artistic origami sheets, you can create a variety of finished pieces by simply changing where you start the fold.
For example, the three origami tulip creations at the top, as well as the bottom, came from the sheet on their left by starting from a different corner of that same sheet.
Project from these origami card making tips and tricks:
Mothers Day Card
Edges Are Fun but Tricky
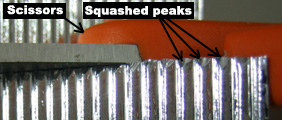
Don't Let Your Edges Cause a Door Jam
Your nicely crafted edges can cause a jam if they swing by each other like edges of a door.
So, cut off slivers from the edges to create space for smooth swings.
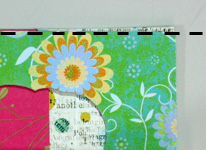
By the way, if the card-piece has art on it, you'll want to cut off slivers from each of the edges as shown here instead of just one edge. This way, the art will not misalign after you're done.
Related door jam project: Unique Wedding Invitation
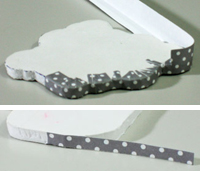
Card Making Tips & Tricks to Hide the Page Edges
Have you noticed that, when joining multiple sheets to create the individual pages of your card, the bent tab you glue down stick out like a sore thumb from the top and bottom of the card?
To hide this tab, cut off a sliver from the top and bottom before you glue it down. This gives the illusion of a seamless card...
...At least, until the recipient flips the card over out of curiosity about your exceptionally seamless creation.
Transformation from multiple sheets to seamless pages: Thank You Card
Working with Flimsy Edges of Reinforced Cards
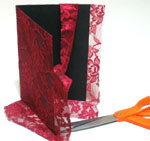
After supporting your flimsy material with reinforcing cardstock, you can take care of the edges in many ways.
One obvious way is to cut off the excess material. Another way is to fold the flimsy material inward to enhance the edges of the card. What others can you think of?
Examples of reinforced cards and edges: Love Greeting Card | Birthday Greeting Card | Unique Birthday Card
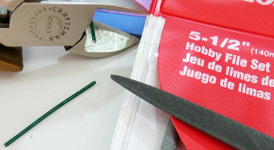
For Safety, No Sharp Edges Allowed
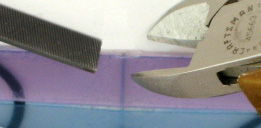
There are times when you have to cut off wires sticking out of edges. This is tough because the card edges sometimes get in the way. Hence, the unsafely sharp wires still protrude undesirably.
For this, use precision files to abrade away the protruding wire.
Craft from these card making tips and tricks: Unique Wedding Invitation
Creating Decorative Edges that Align Afterward
It's difficult to align fancy edges after they are cut without creating spaces and gaps.
One way of overcoming this is temporarily taping the cardstock pieces together before the cut.
Hence, afterwards, the two edges will still align perfectly.
Card related to these card making tips and tricks: Kids Birthday Card
Trying to Cut Foam Board without Creating Edge Defects?
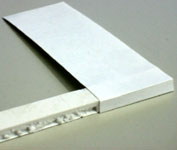
Needless to say, it's difficult and tedious to cut a foam board and leave a smooth edge.
These jagged edges don't ordinarily matter if the board is hidden behind other materials.
But if exposing the edge, then it's usually easier to mask it with a strip of plain paper.
Cards with exposed edges: Thinking of You Card | Thank You Card
Cards with
unexposed edges:
Pizza Party Invitation
|
Baby Shower Greeting Card
Does Your Card Look Wobbly or Rushed because of Page Height Differences?
When using individual sheets to put together the separate pages of your card, the finished card could wobble from the slight differences in the heights of the sheets. Additionally, this sliver makes the project to look like a rushed job.
To tackle this, either cut the sheets all at once instead of cutting them individually, or cut the sliver off after you're done making the card.
Related edge project:
Thank You Card
Letters, Words, & Calligraphy
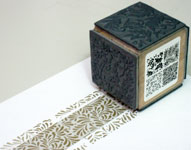
Aligning Clear Stamp Letters and Characters
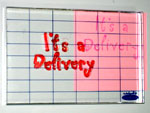
Use the grid lines on the stamping block to align clear rubber stamps.
This works great with single letters and digits as well as whole words and characters.
Related projects:
New Baby Greeting Card
|
Miss You Card
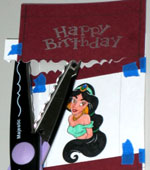
Working with Highly Raised or Textured Material Surfaces
Trying to print on highly textured or raised materials? It's almost impossible to use regular methods like rubber stamping and rub-ons to create legible letters.
For this, try alternatives like sturdy 3D lettering stickers to help overcome this challenge.
Examples from these card making tips and tricks:
Birthday Greeting Card
|
Unique Birthday Card
Don't Let the Circular Edges Hinder Your Creativity
For card making tips and tricks related to mapping out letters on a circular perimeter, locate the center of the curvature and trace out imaginary lines from this focal point to the letters.
Then, use these imaginary lines to align the letters while creating them.
Related projects:
Golf Birthday Card
|
Pizza Party Invitation
It's Okay to Use Some Stamp Sections and Leave the Rest
Do some of your rubber stamps hold more than you need? Maybe you just want to split the characters to use on different parts of the same card? Simply apply ink pad on only the needed sections.
These card making tips and tricks will save you money because you truly don't have to buy different rubber stamps whenever this situation comes up.
Related projects:
50th Birthday Greeting Card
|
Kids Birthday Card
|
Valentines Day Card
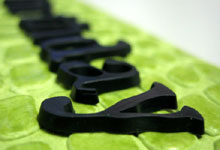
Aligning 3-Dimensional Letters
There's an easier way to align dimensional (3D) lettering stickers than using pencil lines. Why? The 3D letters obstruct you from cleaning the pencil marks afterward.
Instead, use a flat solid item like a steel rule to straighten the pieces. Therefore, no cleaning involved.
Related greeting cards:
Unique Birthday Card
|
Birthday Greeting Card
Tips & Tricks for Your Supplies
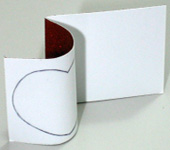
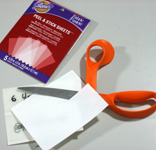
Can't Draw or Erase? Templates to the Rescue!
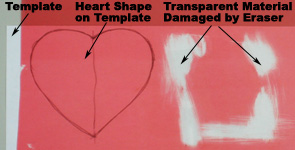
Some specialty materials are so slippery that you can't draw on them. Even some of the ones you can draw on may not welcome erasures. For instance, erasing pencil marks from this transparent material adversely removed pigments.
Nevertheless, there's a fix for this. Just draw what you want on a sheet of paper. Next, attach that paper to your specialty material with temporary tape. Then, use this sheet as a template & guide to cut out your drawing.
Related craft:
Valentines Day Card
The Grid Lines on Your Cutting Mat Are Not for Show
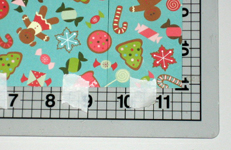
The grid lines on your cutting mat are there for you to align your work while you cut.
The numbers at the perimeter turn the mat into a ruler. Hence, if you're cutting to the grid line dimensions, you don't necessarily need to mark off the locations before cutting.
Applications include:
Christmas Symbols Card
|
Valentine Card
Adding Firmness to Light and Thin Materials
If using flimsy material but want to add rigidity to it, then glue it to a thicker stronger cardstock for skeletal support. This works great whether it's for the whole card or just a small part of it.
Whole cards supported this way: Love Greeting Card | Birthday Greeting Card | Unique Birthday Card
Smaller pieces with added rigidity:
Golf Birthday Card
Don't Forget to Use the Cross Wire Markings on the Punches
Most single shape punches have cross hairs embossed on their access openings.
These markings help to align the inserts while punching.
The result is a duplicable punching process.
Project from this card making tips and tricks:
New Baby Greeting Card
Running Out of Double Sided Adhesive Foam?
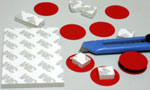
Double sided adhesive foam pieces are awesome for creating 3D effects for your greeting card.
But what happens if you suddenly run out of them half way into your project?
Don't panic. Simply cut up your foam board and use glue to complete the transformation.
Greeting card related to the supplies tips and tricks:
Pizza Party Invitation
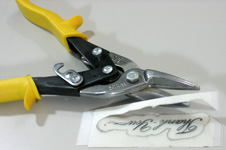
Just Because They're Called Home Improvement Supplies, Doesn't Mean You Can't Use Them
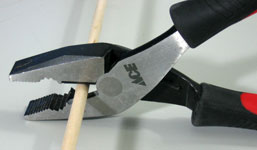
Your home improvement supplies become greeting card supplies when hardware materials come into the picture.
In other words, thick or specialty greeting card materials like wood or metal require specialty greeting card tools like pliers, shears, and other hardware tools.
However, don't let that scare you or limit your creativity. The good news is, most of these home improvement tools are now sold in craft stores because more and more people keep asking for them.
Related craft:
Wedding Invitation
Cleanliness Is Next to Creativeness
Clean Cut May Not Be Clean Enough
Pliers and snipes are the best tools for cutting your metal wires. Yet, these tools leave burrs behind. So, if you're not tucking away the wire ends inside the card, you may have to use files to smooth out the wires after making the cuts.
This ensures the wires don't scratch you later or hurt the person you send the card to.
Cutting and filing projects:
Mother's Day Card
|
Unique Wedding Invitation
At Times, It's Neater to Draw & Cut from Behind
Do you plan to cover the back of your page after cutting out your shape? Then it's cleaner and quicker to draw and cut from that side of the card. Why? You'll cover up all the pencil marks without even erasing them.
Regardless, flip the drawing when necessary. To illustrate, if the figure is not symmetric, draw it transposed. This way, it becomes what you want when you flip back to the front.
Related card projects:
Romantic Holiday Card
|
Thinking of You Card
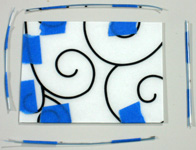
You Can't Clean Off Fingerprints from Glue Sheets
No doubt, when working on see-through materials, glue sheets are your best bet. Nevertheless, it's easy to smear the sheets with your fingerprints. And there's no way to undo this.
Want to prevent this? Use your tweezers to peel off the glue sheets instead of your fingernails.
Transparent card projects:
Unique Wedding Invitation
|
Anniversary Card
|
Valentines Day Card
With Templates, There Are No Pencil Marks to Erase
Templates are helpful in so many ways including preventing cleanups and erasures. Basically, you can draw as many lines as needed to create your sketches without worrying about how those pencil marks would affect the project.
Why? The pencil marks are never on your cards but are always on the templates....
Craft from these template card making tips & tricks:
Valentines Day Card
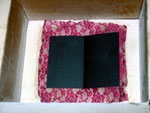
There's No Need for Glue to Get into Unwanted Places
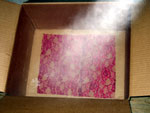
From time to time, there are card crafting projects that work best with spray adhesive.
But, sometimes, you talk yourself out of using the spray because it gets everywhere and is tedious to clean.
Instead, use these preventive card making tips: spray into a tall open box. This way, the high walls of the box catch and contain the glue droplets.
Related greeting card:
Love Greeting Card
Big Stamp Area on Smaller Sheets? No Problem!
Are you stamping a piece of craft-paper that's smaller than your stamp face size?
Then, place a much larger sheet of plain paper underneath that smaller piece to catch the excess ink from the large rubber stamp face area.
This way, there’s no mess to clean after.
Related card project:
Anniversary Card
Covered Glue Sheets Give Easier & Cleaner Cuts
It’s usually difficult to cut adhesive sheets while the glue side is exposed. This is because the glue sticks to the cutting blade. Apart from this, it’s difficult to clean up the blade or scissors afterwards.
Simply use the following card making tips and tricks to prevent this: place a plain sheet over the exposed side of the double sided adhesive sheets.
For this, you can use the same sheet that you removed to expose the adhesive side in the first place. Alternatively, use any ordinary piece of paper.
These card making tips and tricks relate to:
Anniversary Card
|
Unique Wedding Invitation
|
Valentines Day Card

|
|
| |
|
| |


Recent Articles
-
Get Free Greeting Card Templates plus Ideas on How to Make Yours
 Download Various Types of Greeting Card Templates and Get Options for Adapting Them. Includes Precautions and Proactive Steps to Help Prevent Messing Up Yours.
 -
Did You Notice the Revamped Homepage?
Indeed, it’s been a longtime coming, but the homepage makeover is finally here. For comparison, feel free to see the way it used to look as captured through the inescapable Wayback Machine Internet Ar… -
Free Card Greetings for Saying Hello and Goodbye in Your Greeting Card
Get ideas to personalize your greeting card salutations and valedictions because cool card greetings make great first impressions about your greeting card messages.
New! Comments
Have your say about what you just read! Leave us a comment in the box below.