An Origami Mothers Day Card You Can Easily Make
Get card making instructions for this Mothers Day card filled with origami tulips. Includes greeting card message and tips and tricks for transforming the origami art
Are you planning to honor you mom with a vibrant Mothers Day card this time around? Perhaps there’s a special woman you admire for exemplifying motherhood. Then, a colorful card is the way to go. While considering that, why not throw in some origami flowers to turn it into a creative origami greeting card.

If she likes flowers, then this card is perfect. If she loves tulips, then that's just icing on a cake.
If she prefers a different type of flower, then use that type of origami flower. There are numerous types of origami flowers of all sorts available. Just do a little research.
Yes, it might seem logical to avoid the research. However, a little research is worth it to properly honor that wonderful lady, mom, grandma, or woman in your life.
Creating a befitting greeting card message
When you put together a folded, colorful, and beautiful card like this, it only makes sense to use as many of those adjectives as possible in the greeting card message:
From your motherly care and touch,
To flowery folds and colorful scents,
The world is a better place because you’re here
Happy Mothers Day
Card Making Materials and Tools

- One 4.5” x 4.5” colored origami sheets. This card used a red colored sheet
- Four 3” x 3” origami sheets of various colors
- 12” x 12” purple cardstock
- 12” x 12” blue cardstock
- 22 gauge green colored floral stem wires
- Wire cutter
- Rubber stamp
- Black permanent ink pad
- Drawing pencil
- Eraser
- Scissors
- Metal ruler
- Scoring stick
- Cutting mat
- Craft cutting knife
- Glue
Origami Supply Tips and Tricks

You may have to get origami sheets of various sizes in order to find the size you want.
In this case, the 4.5” square sheet came from a pack of assorted sizes.

Another way to get the right size is to cut it from a larger sheet.
For this card, three of the four 3” square sheets came from cutting a larger 6” sheet.
Card Making Instructions
Fold the origami sheet from bottom corner to top corner.
Fold the sheet from left corner to right corner.
Open the fold.
Fold the right arm of the tulip.
Fold the left arm of the tulip.
Flip the tulip over and fold the bottom corner.
Finally, flip it over again and the tulip is finished.
Repeat the above steps for the remaining origami sheets.
Cut out a 6.5” x 9” rectangle from the blue cardstock.
Score and fold this into a 4.5” x 6.5” card.
Cut out a 4” x 6” rectangle from the purple cardstock.
Glue this purple cardstock in the center of the blue card leaving a 0.25” margin all around
Use the rubber stamp and black ink pad to create the writing at the bottom right corner of the card.
Bend the green wires to create stems and leaves.
Arrange the stems and origami tulips on the card to make sure everything fits. Don’t glue down anything yet.
Use the wire cutter to cut the bent stem wires down to size.
Glue the cut stems in place on the Mothers Day card.
Finally, glue the origami tulips over the stems with the corners extending beyond the purple cardstock but not beyond the blue card.


Safety Tip to Consider

Depending on the size of your wires as well as the design and sharpness of your cutter, the cut wires could still have sharp burrs.
Consider deburring them with precision files.

Now, send the card and make that person’s day, Mothers Day that is.
More Card Making Tips and Tricks

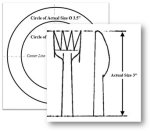
Instead of cutting out the 3” squares from plain origami sheets, the artistic sheets I used provided an added advantage: the art in each quadrant created nice edge effects.
Did you notice that the bottom three tulips in this picture have those fading-color-edge effects?

If your origami sheets have designs on them, then the edges or corners you use to start the fold determine the kind of design you’ll end up with.
These three finished tulip designs came from starting from a different corner of this same sheet.

|
|
| |
|
| |


Recent Articles
-
Get Free Greeting Card Templates plus Ideas on How to Make Yours
 Download Various Types of Greeting Card Templates and Get Options for Adapting Them. Includes Precautions and Proactive Steps to Help Prevent Messing Up Yours.
 -
Did You Notice the Revamped Homepage?
Indeed, it’s been a longtime coming, but the homepage makeover is finally here. For comparison, feel free to see the way it used to look as captured through the inescapable Wayback Machine Internet Ar… -
Free Card Greetings for Saying Hello and Goodbye in Your Greeting Card
Get ideas to personalize your greeting card salutations and valedictions because cool card greetings make great first impressions about your greeting card messages.
New! Comments
Have your say about what you just read! Leave us a comment in the box below.