A Cool Golf Birthday Card to Make for That Golf Lover You Know
Get funny golf birthday message. Also, the card making instructions include time saving tips and tricks plus 3D depth effects
Thinking of sending a golf birthday card to someone that just loves everything about golf? Then, a golf greeting card like this is the way to go.

Generally, most golf cards have tiny golf art and graphics of all sorts.

However, this golf greeting card has a larger than life golf ball right in the center.
This sets it off from the rest.
Hence, the 3D foam effect is just icing on the cake.
Greeting Card Phrase for the Golf Card
Another benefit of having a larger than life golf art on the card is that you can use that in the golf birthday card message. For example:
For your birthday,
I wanted to get you
The biggest golf ball I could find...
...I guess the one on this card will have to do.
Happy Birthday!
Tools and Materials

A sheet of grass art cardstock paper
Golf cardstock paper with at least two 4” diameter balls
8.5” x 11" white cardstock paper
1/16” thick white foam adhesive sheet
1/16” thick green foam adhesive sheet
Black alphabet rub-ons
Circle template
Drawing pencil
Colored pencils
Eraser
Scissors
Metal ruler
Scoring stick
Cutting mat
Craft cutting knife
Glue
Card Making Instructions
Score and fold the white 8.5” x 11” cardstock into a 5.5” x 8.5” card.
Draw and color a big golf club with 1” handle about 3.5” from top of the folded card. Hence, the finished card will have about 5.5" length and 5" height.
There’s no need to color the center of the club where the golf ball will fit.Cut out and glue the grass cardstock to cover up the bottom of the golf birthday card below the club. This creates the illusion of the grass behind the club.
Cut out two 4” golf balls.
Glue the first golf ball cut out in the center of the golf club.
Cut out the final card shape by tracing the perimeter of the club, ball, and grass.
Cut out a piece of 1.5” x 5.5” grass paper strip with zigzag top. This zigzag top should follow the weaves and bends of the grass.
On the green foam piece, draw and cut out a strip of the similar silhouette as the grass strip but about with ⅛” margin all round.
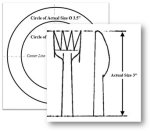
On the white foam board, draw and cut out a 3.5” circle.
Place the green foam strip and then the white round foam piece on the card. Play around with them to trace out the section where the two intersect. Then cut off this intersecting part from the green foam piece.
Next, glue the white round foam piece in the middle of the golf ball and the green foam piece about ⅛” away from the left, right, and bottom edges.
On the second golf ball cut out, use the black alphabet rub-ons to print “happy birthday” on the round curvature of this cut out.
Glue this second golf ball cut out right in the middle of the foam strip.
This time, using 1.25” x 5.5” dimensions, cut out a another piece of grass paper strip with zigzag top. Remember, the zigzag top should follow the weaves and bends of the grass.
On the green foam piece, draw and cut out another strip of the similar silhouette as the above grass strip but about with ⅛” margin all round.
Glue this foam piece on the grass section maintaining the same ⅛” margin.
Finally, glue the last piece of grass cardstock strip and the golf birthday card is done.


Cool Trick

If you have flimsy cardstock paper just like this grass one and you want it to have some rigidity, glue it on a piece of white cardstock to support it before using it.
Then, cut out and use this new thicker and more rigid creation.
Time Saving Tip

To save time, use the grass cut out shape to trace the silhouette on the foam board.


Lettering Trick

To create the letters on the curved surface, locate the center of the golf ball.
Then, use that center to align the letters with imaginary lines.

More Tips and Tricks

To save time, it's simpler to use a background color that suits the golf club.
For instance, instead of plain white cardstock, use grey or metallic cardstock to draw the golf club.
This golf birthday card uses colored foam pieces for added effect.
If you don’t have any colored foam piece, feel free to use regular white foam board.

|
|
| |
|
| |


Recent Articles
-
Get Free Greeting Card Templates plus Ideas on How to Make Yours
 Download Various Types of Greeting Card Templates and Get Options for Adapting Them. Includes Precautions and Proactive Steps to Help Prevent Messing Up Yours.
 -
Did You Notice the Revamped Homepage?
Indeed, it’s been a longtime coming, but the homepage makeover is finally here. For comparison, feel free to see the way it used to look as captured through the inescapable Wayback Machine Internet Ar… -
Free Card Greetings for Saying Hello and Goodbye in Your Greeting Card
Get ideas to personalize your greeting card salutations and valedictions because cool card greetings make great first impressions about your greeting card messages.
New! Comments
Have your say about what you just read! Leave us a comment in the box below.