In Making This Christmas Symbols Card, What Holiday Figures Would You Use?
Get instructions plus tips and tricks to add variety
For this Christmas symbols card, the images shouldn't be too small or too big. That way, anyone can recognize them after you have cut the paper into strips.

Hence, picking out the cardstock paper with Christmas symbols to use for the holiday card is an adventure.
Suitably, the cardstock here contains enough holiday figures to make an awesome Christmas card. They include socks, ornaments, candy cane, plus gingerbread man and woman.
What other symbols do you see here? Better yet, what symbols will you use on your own holiday card? Have fun with the hunt.
Tools and Materials
First 8.5” x 11” Christmas symbols cardstock paper
Second 8.5” x 11” Christmas symbols cardstock paper
Cardinal red 8.5” x 11” crisscross textured cardstock paper
White 8.5” x 11” cardstock paper
Rubber stamps
Black ink pad
Red ink pad
Colored pencils
Scissors
Sliding paper trimmer
Metal ruler
Scoring stick
Circle cutter (hole cutter)
Cutting mat
Cutting knife
Glue
Step by Step Instructions
Score the cardinal red cardstock 2.75” from the left and 2.75” from the right. Then fold to transforms the cardstock into a 8.5” x 5.5” double door card that opens from the middle.
Using the first Christmas symbols cardstock, cut out a 7.75” x 2” strip.
Using the second Christmas symbols cardstock, cut out another 7.75” x 2” strip.
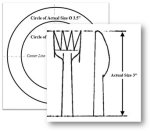
Place the first strip on the cutting mat such that the center of the long side (right side) of the strip is ⅜” from the center of the cutting circle. Then cut out the circular segment with a 3” diameter circle.
Place the second st strip on the cutting mat such that the center of the long side (left side) of the strip is ⅜” from the center of the cutting circle. Then cut out the circular segment with a 3” diameter circle.
Glue the left symbols cardstock strip to the left door of the holiday card. Such that the strip is in the middle of the door. This means the edges of the strip would be ⅜” from all edges of the red door
Glue the right symbols cardstock strip to the right door of the Christmas card. Just like the left strip above, place this right strip in the middle of the right door.
On the white cardstock paper, use the rubber stamp and black ink pad to create a wreath.
Use the rubber stamp and red ink pad to create the round “joy” in the middle of the wreath.
Use colored pencils to color the leaves of the wreath. I used two shades of green here to add contrast.
Place the white cardstock paper on the cutting mat. Then use the circle cutter to cut out a 2.25” diameter circle with the wreath in the middle of the circle.
Using glue only on left half of the this 2.25” diameter circle, glue this left half of the circle to the left door of the Christmas card. And the card is done.

Important Tip

One common mistake here is to end up with symbols that are unintentionally upside down when you finish the card.
If it is impossible for the cardstock design to be accidentally upside down, then there is no need to take note of the right or left side. Simply pick any side and cut out the circular segment.
For example, in this card, the cardstock used on the left door can be placed in any direction.
But the cardstock on the right door can be placed in only one direction. Because it would be awkward for socks to be floating upward or hanging to the left or right. The only direction for socks to hang is downward.
Cool Trick
A cutting mat that has grid lines with measurements will come in very handy in this step.
This way, you can simply use a low tack masking tape to hold the strip at the exact distance before cutting.

Please Note
As you can see, I created three wreaths with different words in the middle. ...Just to keep my options open.
That was easy. Right? Great. Now put down something nice inside the holiday card and you’re done.
Not sure what color of ink to use inside the card? Then check out other tips and tricks below.
Other Tips and Tricks
Inside the card, use white, silver, or gold ink.
Don't have this kind of light color ink? then use whatever dark ink you have on a different cardstock of lighter color like white, pastel red, or pastel green.
Cut out a rectangle of 3.5" x 6.5" from this light cardstock, making sure the greeting card message fits nicely inside this box. Then glue this rectangular piece right in the middle inside the card.
You can omit the “joy” word in the middle of the Christmas symbols card, leaving it blank.
Another option is to personalize it by adding the recipient’s name with a red marker. Actually, this might be the better option. Try it and see.

|
|
| |
|
| |


Recent Articles
-
Get Free Greeting Card Templates plus Ideas on How to Make Yours
 Download Various Types of Greeting Card Templates and Get Options for Adapting Them. Includes Precautions and Proactive Steps to Help Prevent Messing Up Yours.
 -
Did You Notice the Revamped Homepage?
Indeed, it’s been a longtime coming, but the homepage makeover is finally here. For comparison, feel free to see the way it used to look as captured through the inescapable Wayback Machine Internet Ar… -
Free Card Greetings for Saying Hello and Goodbye in Your Greeting Card
Get ideas to personalize your greeting card salutations and valedictions because cool card greetings make great first impressions about your greeting card messages.
New! Comments
Have your say about what you just read! Leave us a comment in the box below.