For That Baby Shower Greeting Card, Make This Cute and Funny Diaper Card
Get card making instructions for this 3-D funny baby shower card. Plus, get humorous card message for inside
Wondering why this baby shower greeting card looks like a diaper?
Because, in making creative cards, one cool method is to focus on the theme. And that’s exactly the key to putting this baby shower card together.

This simple card is easy to make. And that simplicity actually makes it cute and elegant.
Bottom line, the hardest part of making the baby shower greeting card is transforming it for a boy or a girl. And there’s a solution for that in the tips and tricks section below.
It's a breeze to transform this cool card into a funny one
The diaper theme makes it easy to add humor inside the card. Hence, transforming the project into a funny baby shower greeting card.
For instance, write:
...Now, let the
diaper changing begin!
Congratulations once more!
Tools and Materials
4.5” x 11” white cardstock paper
4” x 5” powder blue canvas textured cardstock paper - lighter blue paper
4” x 5” pastel blue cardstock paper - darker blue paper
First 3.5” x 4.5” white foam board
Second 3.5” x 4.5” white foam board
Blue Lagoon ink pad - light blue color
Blue Iris ink pad - dark blue color
Drawing pencil
Eraser
Scissors
Rubber stamps
Mounting blocks for rubber stamps
Sliding paper trimmer
Metal ruler
Scoring stick
Circle template
Circle cutter (hole cutter)
Cutting mat
Craft cutting knife
Glue
Step by Step Instructions
On the powder blue cardstock paper, use the pencil and ruler to mark off 2” from the left and right of all the corners. This helps to align the paper with the grid lines of the cutting mat.
Place the cardstock on a cutting mat. You might have to tape it down so it doesn’t move.
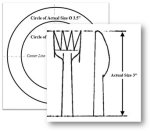
Using a 4” diameter cutting circle, cut out both circular sections that represent the inner part of the diaper leg openings.
Erase the pencil marks.
On the first foam board, use circle template and pencil to draw 2” radius curves at the bottom left and right.
Place this foam board on the cutting mat and use the craft knife to cut out these quadrants from the bottom left and right corners
On the powder blue cardstock, use the light blue ink pad and rubber stamp to print “Congratulations” slightly to the left of the paper. This is about ¾” from top and left and makes room for the other later words.
Using the dark blue ink and rubber stamps, print “It’s a Boy” on the right, slanting diagonally at about a 45 degree angle.
Turn the powder blue cardstock piece face down, and glue the matching cutout foam piece in the middle of the paper. Therefore, giving the foam a margin of about ¼” from all the edges.
On the pastel blue cardstock paper, just as before, use the pencil and ruler to mark off 2” from the left and right of all the corners. This helps to align the paper with the cutting mat grid lines.
Place the cardstock on a cutting mat. You might have to tape it down so it doesn’t move.
Using a 4” diameter cutting circle, cut out both circular sections that represent the outer part of the diaper leg openings. Note that this is a direct opposite to the first cutout above.
Clean off any pencil marks on this piece of the baby shower greeting card.
On the second foam board, use circle template and pencil to draw 2” radius curves at the bottom left and right. Again, this is a direct opposite to what’s on the first foam board above.
Place this foam board on the cutting mat and use the craft knife to cut out these curves from the bottom left and right corners.
Turn the pastel blue cardstock piece face down, and glue the matching cutout foam piece to the center of the paper. Hence, the foam piece has a margin of about ¼” from all the edges.
Score the white cardstock in the middle and fold it into a 4.5” x 5.5” card.
Next, use the pencil and ruler to mark off 2.25” from the left and right of all the corners. This helps to align the paper with the grid lines of the cutting mat.
Place the folded and marked white cardstock on a cutting mat. You might have to tape it down so it doesn’t move.
Using a 4.5” diameter cutting circle, cut out both circular sections that represent the outer part of the leg openings. Note that this shape is similar to the last cut out.
Erase the pencil marks on the baby shower greeting card.
Glue the foam of the pastel blue cardstock on top of the white cardstock. Align it such that the blue cardstock has a ¼” border around the white cardstock.
Finally, glue the foam of the powder blue cardstock on top of the pastel blue cardstock. So that the straight edges of this powder blue cardstock aligns directly on top of the pastel blue cardstock.

Cool Time Saving Tricks

It’s easier to trace these foam curves from the previously cut cardstock.
If the foam board is thick, it’s best to cut from both top face and bottom face.
Hence, to guide the cut, draw the curves on the top and bottom faces.


So now, you have the simple and elegant baby shower greeting card in your hands.
One other cool thing about this baby shower card is that it also works as a baby birth announcement card.
Other Tips and Tricks
- Don’t have different shades of blue ink pads? Then use what you have. The card will still turn out great with only one shade of ink.
- As a rule of thumb, for a baby shower greeting card, blue stands for a boy and pink stands for a girl. However, there’s no harm in bending and breaking this rule. So use whatever colors you want to create whatever type of card that comes to mind.

|
|
| |
|
| |


Recent Articles
-
Get Free Greeting Card Templates plus Ideas on How to Make Yours
 Download Various Types of Greeting Card Templates and Get Options for Adapting Them. Includes Precautions and Proactive Steps to Help Prevent Messing Up Yours.
 -
Did You Notice the Revamped Homepage?
Indeed, it’s been a longtime coming, but the homepage makeover is finally here. For comparison, feel free to see the way it used to look as captured through the inescapable Wayback Machine Internet Ar… -
Free Card Greetings for Saying Hello and Goodbye in Your Greeting Card
Get ideas to personalize your greeting card salutations and valedictions because cool card greetings make great first impressions about your greeting card messages.
New! Comments
Have your say about what you just read! Leave us a comment in the box below.